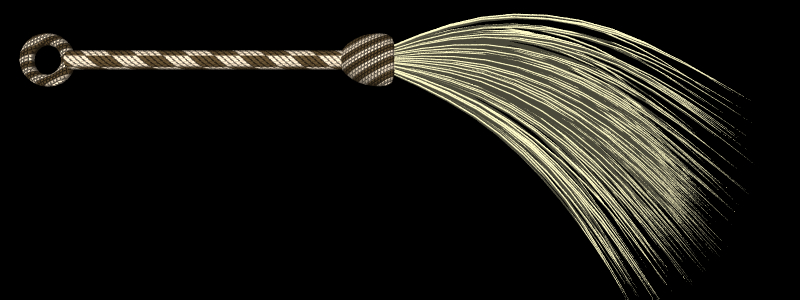

The handle was modelled by hand out of simple geometric shapes. The hairs are generated by the following script:
waviness = 0.1;     // Controls how straight the hairs are
length = 3.0;       // Length of each hair
thickness = 0.02;   // Thickness of each hair
hairs = 300;        // Number of hairs
coneAngle = 25.0;   // Sets the width of the "cone" of hairs at the base
gravity = new Vec3(0.0, -0.5, 0.0);  // Sets the strength and direction of gravity

if (script.isPreview())
  hairs = 20;
script.getCoordinates().toLocal().transformDirection(gravity);
random = new Random(0);
segmentLength = length/3.0;

// Main loop to create the hairs

for (i = 0; i < hairs; i++)
{
  v = new Vec3 [4];

  // Set the base at the origin.

  v[0] = new Vec3();

  // Determine the direction of the hair when it leaves the base.

  theta = coneAngle*random.nextDouble()*Math.PI/180.0;
  phi = random.nextDouble()*2.0*Math.PI;
  dir = new Vec3(Math.cos(theta), Math.cos(phi)*Math.sin(theta), Math.sin(phi)*Math.sin(theta));

  // Place the remaining vertices.

  for (j = 1; j < v.length; j++)
  {
    // Place the next vertex.

    dir.normalize();
    v[j] = v[j-1].plus(dir.times(segmentLength));

    // Add a random displacement to the direction.

    dir.x += waviness*(random.nextDouble()-0.5);
    dir.y += waviness*(random.nextDouble()-0.5);
    dir.z += waviness*(random.nextDouble()-0.5);

    // Add a displacement due to gravity.

    dir.add(gravity);
  }

  // Create the hair.

  hair = new Tube(v, (float []) [1.0f, 1.0f, 1.0f, 1.0f], (double [])
      [thickness, thickness, thickness, 0.0], Tube.APPROXIMATING, Tube.OPEN_ENDS);
  script.addObject(hair, new CoordinateSystem());
}
This script is longer and more complicated than the ones we have seen before, but still not really all that complicated. Let's look at it carefully to see how it works.
It begins by defining various constants that affect the behavior of the script: the number of hairs to generate, the length and thickness of each hair, etc. This is generally a good approach to follow. Placing all the configurable options together at the top of a script makes it easy to modify them.
Next consider the following lines:
if (script.isPreview())
  hairs = 20;
A complex script may take a significant amount of time to run, and if it generates very complex geometry, that may be slow to render. That is fine when doing high quality renders, but it can make interactive editing very slow and painful. By calling script.isPreview(), you can determine when the script is being executed to generate an interactive preview. In this example, we generate 300 hairs for final rendered images but only 20 hairs for interactive previews.
The next line reads:
script.getCoordinates().toLocal().transformDirection(gravity);
We previously defined the gravity vector to point downwards (0.0, -0.5, 0.0). Remember, though, that all geometry we define will be interpreted in the local coordinate system of the scripted object. We really want gravity to point downward in the global coordinate system. Therefore, we need to find a vector in local coordinates which corresponds to "down" in global coordinates.
script.getCoordinates() returns the coordinate system of the scripted object. You can then call toLocal() or fromLocal() on it to get transformation matrices (artofillusion.math.Mat4) which convert either to or from the local coordinate system.
Next comes the main loop which generates the hairs, each one represented by a four vertex Tube object. The first vertex is always placed at the origin. The second one is placed randomly in a cone of specified width. For each successive vertex, we randomly modify the direction (to add waviness to the hairs), and also modify it based on gravity. Finally, we construct the Tube and add it to the scripted object.
I said before that one of the most important features of scripted objects is that they can be "intelligent", defining behavior as well as appearance. We previously saw two ways that scripts can define behavior: the object can vary explicitly with time, or it can change based on adjustable parameters. This script demonstrates another type of behavior: the object varies based on its position within the scene. As the flyswatter moves around, the hairs always hang downward in a realistic way.

This script is a very flexible one. With only slight modifications, it could be used to represent all sorts of other things: the hair on a person's head, a clump of grass, a fountain of water, etc. Often, you will want to save a script to use again in other scenes. The "Load" and "Save" buttons in the scripted object editor window make it easy to save scripts to disk.
Whenever you create a new scripted object, you are given a choice of what script to use. So far, we have always selected "New Script". You can add scripts to the list of choices by saving them in the ArtOfIllusion/Scripts/Objects folder. This makes it easy to keep around a set of useful object scripts, and reuse them in many scenes.